
In this article we are going to learn about How to install K3s with Calico.
Kubernetes (K8s) is used for automated deployments, scaling and management of containerized applications and has become an industry standard platform for container orchestration.
Kubernetes has a robust architecture that makes it easy to do DevOps and infrastructure management.
But on the flip side Kubernetes deployments are resource intensive, which has lead to the development of lighter distributions like the K3s.
K3S provides a streamlined, single binary installation that drastically reduces resource overhead, making it best for edge computing, IoT devices and other environments that have limited resources
Considering the networking, Kubernetes has Container Network Interface (CNI) plugins, such as Calico, to manage inter-container communication
Calico has wide recognition for high performance, scalability, and security. It has advanced network policies and security features that enable network segmentation and control.
When using K3S with Calico you get the strength of both of these technologies.

Pre -requisites
- Hardware and Software Requirements
- OS: Debian or Ubuntu
- CPU: 2 core cpu but 4 core is recommended
- RAM: 2 GB ram minimum 4 GB is recommended
- Storage: 20 GB disk space but more is recommended
- Essential Tools:
- SSH access
- Curl utility
- Kubectl installed
- Root or Sudo privileges
Initial Environment Setup
Make sure to open necessary ports in the firewall
- Kubernetes API server: port number
6443/TCP - Calico networking: Port number
179/TCP(BGP) and4789/UDP(VXLAN)
Ubuntu UFW firewall:
sudo ufw allow 6443/tcp
sudo ufw allow 179/tcp
sudo ufw allow 4789/udp
sudo ufw reload
Check open ports
sudo ufw status
Disable Swap Memory
Kubernetes needs the swap memory to be disabled, this is to make sure proper memory allocation
Disable swap code
sudo swapoff -aPrevent swap from re-enabling after reboot
sudo sed -i '/swap/s/^/#/`\' /etc/fstabcheck if the swap is disabled
free -h
# you can check if the swap shows 0 Bytes
Configure Kernel Modules and Networking Parameters
1.Load Necessary Kernel Modules
Kubernetes needs specific kernel modules like overlay and br_netfilter for networking
load the below modules
sudo modprobe overlay
sudo modprobe br_netfilter
2.configure kernel modules to load on boot
here we are creating a config file to make sure that kernel modules load automatically when the server is rebooted
cat <<EOF | sudo tee /etc/modules-load.d/k8s.conf
overlay
br_netfilter
EOF
3.configure required networking parameters
Kubernetes relies om IP forwarding and bridge filtering networking parameters
Create a sysctl configuration file
cat <<EOF | sudo tee /etc/sysctl.d/k8s.conf
net.bridge.bridge-nf-call-iptables  = 1
net.bridge.bridge-nf-call-ip6tables = 1
net.ipv4.ip_forward                 = 1
EOF
net.bridge.bridge-nf-call-iptables = 1andnet.bridge.bridge-nf-call-ip6tables = 1- This enables the network packets to be processed by iptables rules for bridging traffic. both the rules are for ipv4 and ipv6
net.ipv4.ip_forward = 1- Forwards the IPv4 network packers, this is to enable pod-to-pod communication across nodes
4.Apply Networking parameters immediately
Once you have created the configuration file, apply the settings with
sudo sysctl --systemexpected output
* Applying /etc/sysctl.d/k8s.conf ...
net.bridge.bridge-nf-call-iptables = 1
net.bridge.bridge-nf-call-ip6tables = 1
net.ipv4.ip_forward = 1
* Applying /etc/sysctl.conf ...
4.Adjust Security Modules (SELinux/AppArmor)
Security modules like SELinux RedHat/CentOS or AppArmor Ubuntu might restrict Kubernetes functionality
SELinux
Check the SELinux status
sestatus
If SELinux is enforcing, configure it to permissive mode temporarily for testing
sudo setenforce 0
sudo sed -i 's/^SELINUX=enforcing/SELINUX=permissive/' /etc/selinux/config
AppArmor Ubuntu
Make sure AppArmor allow Kubernets containers to run properly
sudo aa-status
If issues arise, temporarily disable problematic profiles:
sudo systemctl stop apparmor
sudo systemctl disable apparmor
#disable only if you encounter conflicts, otherwise lease AppArmor active.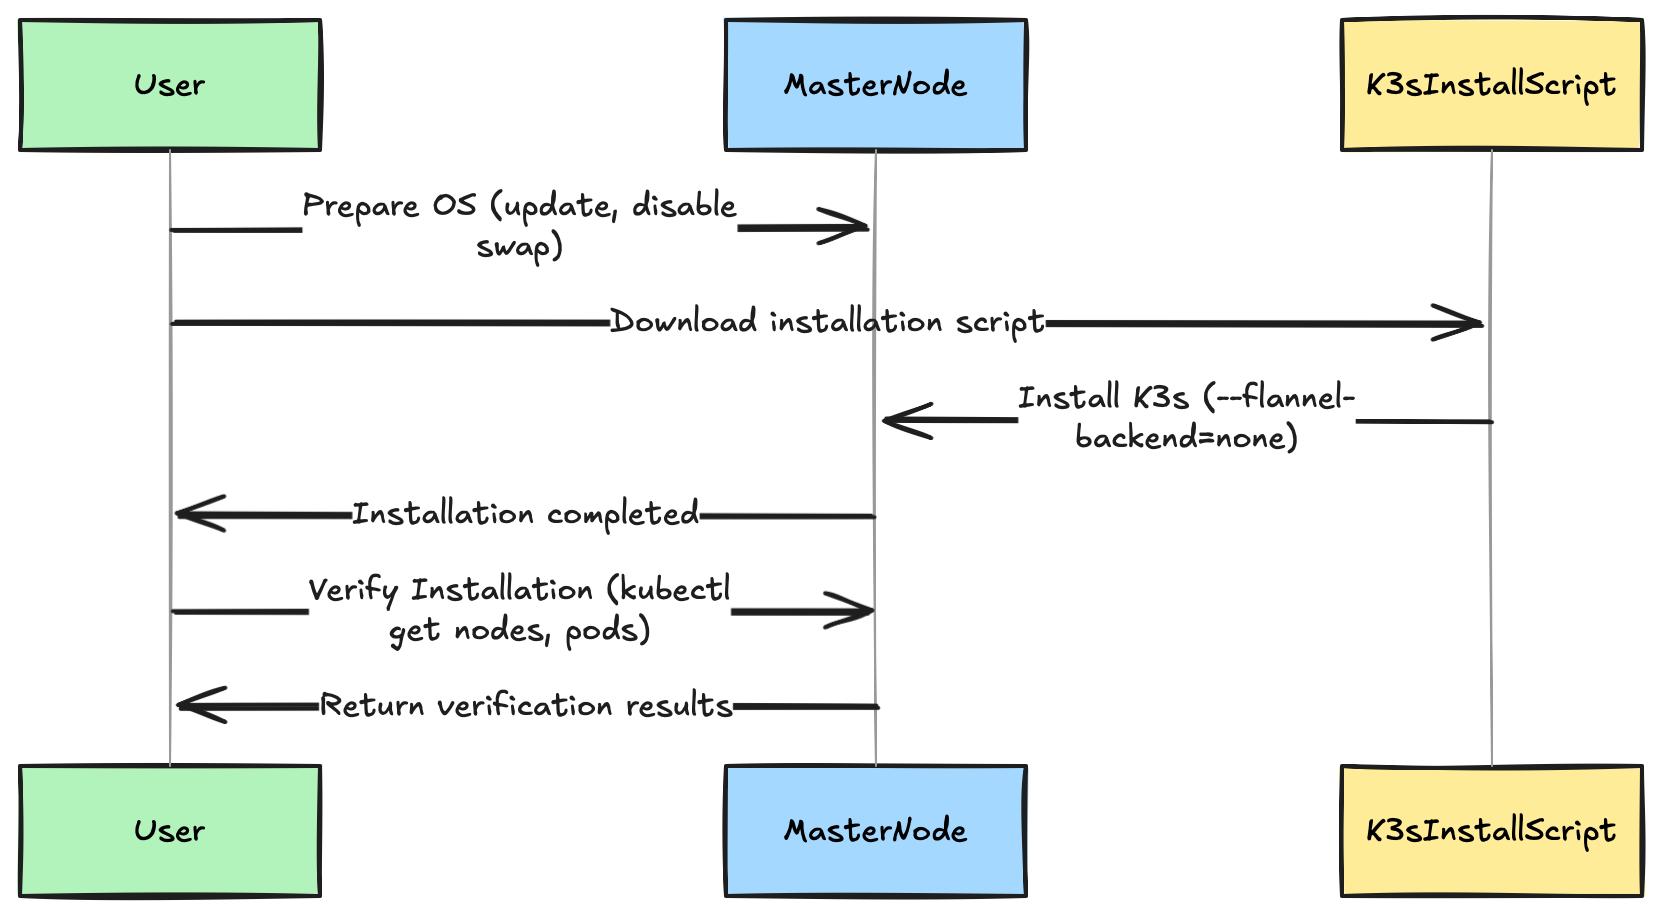
Installing K3s: Step By Step guide
step1: Preparing your system
Before installing K3s, make sure that kernel modules are configured, your operating system has been updated and swap is disabled
We have done all these steps above.
step 2: Installing K3s on the Master Node
we are going to use the official K3s installation script that is provided by the Rancher Labs
Important Note:
Since we are installing Calico later, we must first disable k3s default Flannel networking
The below command installs the K3s and disables the built in networking
curl -sfL https://get.k3s.io | sh -s - --flannel-backend=none --disable-network-policy
--flannel-backend=nonethis disables the K3s default plugin (Flannel) to allow Calico to manage networking--disable-network-policythis disables built in network policies to prevent conflicts with calico
wait to then installation to finish
Step 3 verify the installation
once you have installed K3s, let us verify the same
sudo systemctl status k3s
you should see the active status like:
● k3s.service - Lightweight Kubernetes
   Loaded: loaded (/etc/systemd/system/k3s.service; enabled; vendor preset: enabled)
   Active: active (running)
step4: Using kubectl to verify node status
K3s automatically installs kubectl as a part of its deployment
set the permissions and export the kubernetes configuration for the kubectl to access the cluster
sudo chmod 644 /etc/rancher/k3s/k3s.yaml
export KUBECONFIG=/etc/rancher/k3s/k3s.yaml
if you want the persistence across terminal sessions then append it to .bashrc
echo 'export KUBECONFIG=/etc/rancher/k3s/k3s.yaml' >> ~/.bashrc
source ~/.bashrc
check if your master node is in ready state
kubectl get nodesyou should see the output
NAME           STATUS   ROLES                  AGE   VERSION
k3s-master01   Ready    control-plane,master   3m    v1.28.4+k3s1
Check Kubernetes system pods:
Make sure all system pods are running or completed successfully:
kubectl get pods -n kube-system
You should observer pods similar to
NAME                                      READY   STATUS      RESTARTS   AGE
metrics-server-6d8d9fb4dd-7sxtv           1/1     Running     0          3m
local-path-provisioner-66f87d9c7d-jdqnb   1/1     Running     0          3m
coredns-7796b77cd4-z7ztz                  1/1     Running     0          3m
helm-install-traefik-crd-xzmpj            0/1     Completed   0          3m
helm-install-traefik-89xlh                0/1     Completed   1          3m
Summary
here are all the commands that we used
# Update system
sudo apt update && sudo apt upgrade -y

# Kernel modules & network configuration
sudo modprobe overlay && sudo modprobe br_netfilter
cat <<EOF | sudo tee /etc/modules-load.d/k8s.conf
overlay
br_netfilter
EOF

cat <<EOF | sudo tee /etc/sysctl.d/k8s.conf
net.bridge.bridge-nf-call-iptables  = 1
net.bridge.bridge-nf-call-ip6tables = 1
net.ipv4.ip_forward                 = 1
EOF
sudo sysctl --system

# Disable swap permanently
sudo swapoff -a && sudo sed -i '/ swap / s/^/#/' /etc/fstab

# Install K3s without built-in networking (for Calico)
curl -sfL https://get.k3s.io | sh -s - --flannel-backend=none --disable-network-policy

# Configure kubectl
sudo chmod 644 /etc/rancher/k3s/k3s.yaml
echo 'export KUBECONFIG=/etc/rancher/k3s/k3s.yaml' >> ~/.bashrc
source ~/.bashrc

# Verify installation
kubectl get nodes
kubectl get pods -n kube-system
Adding Worker Nodes
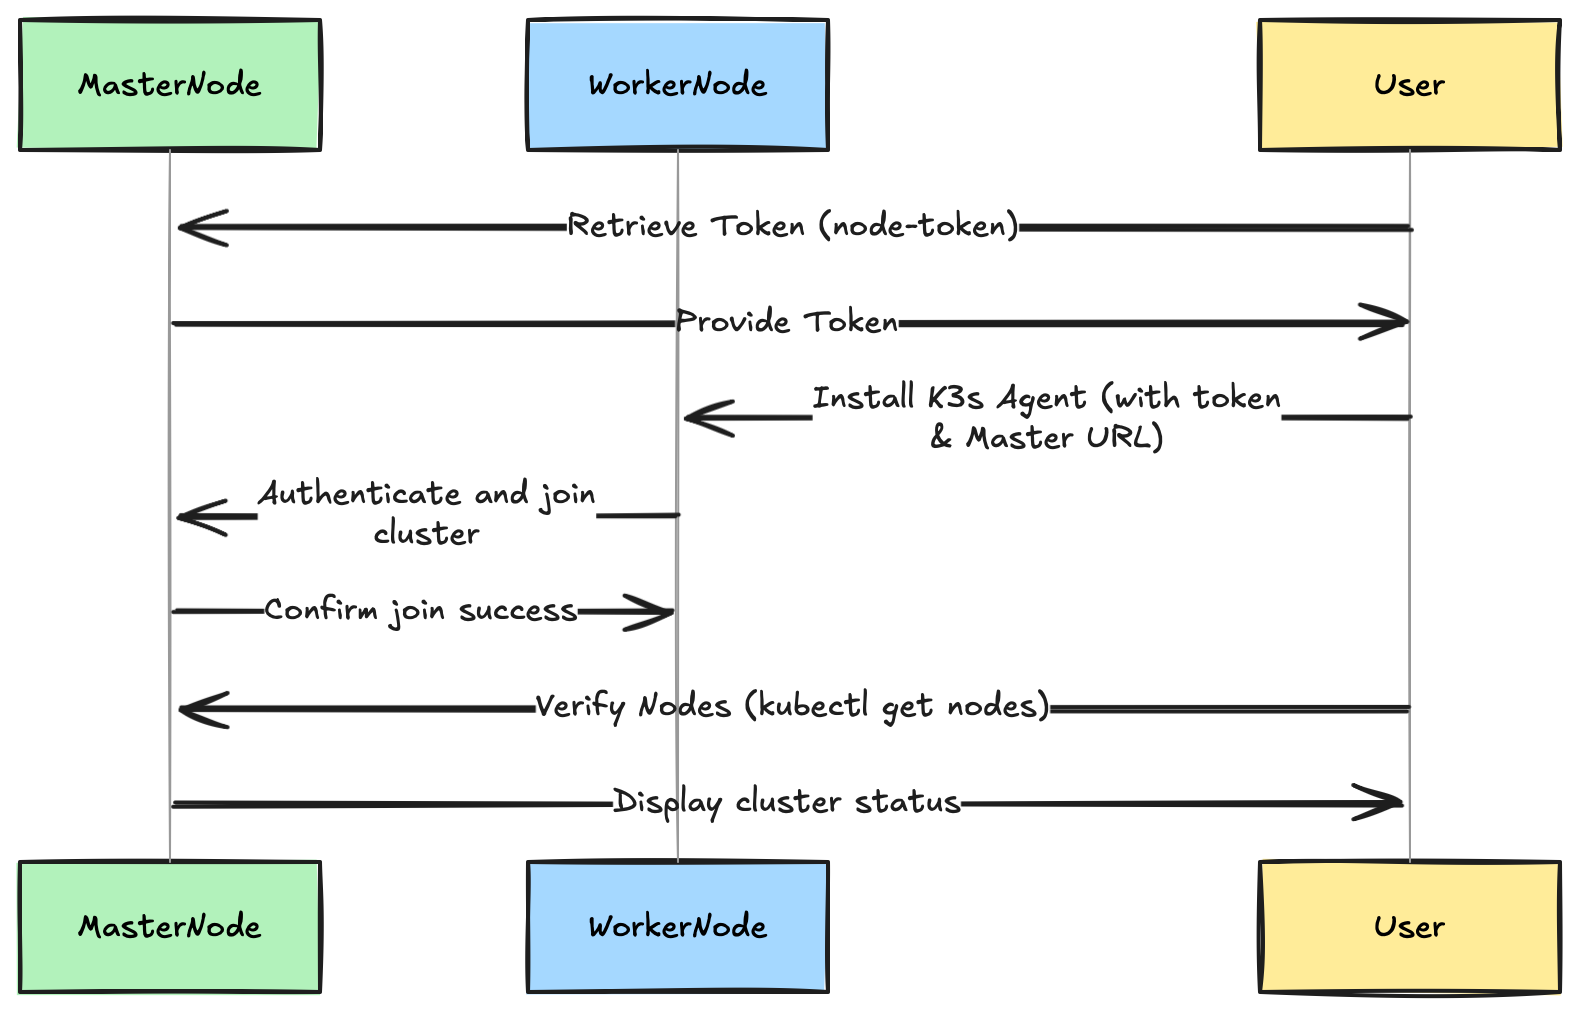
Here is how you can scale K3s cluster by adding worker nodes (agents), follow these straightforward steps:
Steps 1: Obtain the K3s Token from the Master Node
Each worker node requires a token (secret) to authenticate and join the master node
On the master node, retrieve the K3s token with
sudo cat /var/lib/rancher/k3s/server/node-token
the output will be something like this
K10395fdsfdsfdsfc47a0cb9c3a9c37bd858e841ccfb6a0e6ff438bf8b6cc68e1234c4::server:abcdef01ytrgbfhf789abcdef0123456789
save this token, we will need it when installing the worker nodes
Step2 : Installing and Configuring Worker Nodes
perform the following steps on each worker node that you wish to add the cluster
- Prepare the worker node
- Make sure that the worker node is updated and the swap is disabled
sudo apt update
sudo apt upgrade -y
sudo swapoff -a
sudo sed -i '/ swap / s/^/#/' /etc/fstab
- Load the necessary kernel modules and networking configurations
sudo modprobe overlay
sudo modprobe br_netfilter

cat <<EOF | sudo tee /etc/modules-load.d/k8s.conf
overlay
br_netfilter
EOF

cat <<EOF | sudo tee /etc/sysctl.d/k8s.conf
net.bridge.bridge-nf-call-iptables  = 1
net.bridge.bridge-nf-call-ip6tables = 1
net.ipv4.ip_forward                 = 1
EOF

sudo sysctl --system
- Install the K3s Agent on the worker node
Use the below command and replace
<MASTER_NODE_IP>: The master node's actual IP address or DNS name.<k3s_NODE_TOKEN>the token that was retrieved earlier from the master node
Here is the complete command
curl -sfL https://get.k3s.io | K3S_URL=https://<MASTER_NODE_IP>:6443 K3S_TOKEN=<K3S_NODE_TOKEN> sh -
Step 3 Verifying Nodes and Pod Scheduling
Once you have installed the worker nodes, verify the successful integration into the cluster
on the master node check the node status using the below command
kubectl get nodes
expected output an example
NAME           STATUS   ROLES                  AGE     VERSION
k3s-master01   Ready    control-plane,master   10m     v1.28.4+k3s1
k3s-worker01   Ready    <none>                 2m      v1.28.4+k3s1
k3s-worker02   Ready    <none>                 2m      v1.28.4+k3s1
Step4: Ensuring workload distribution and health checks
deploy a simple test workload to check if Kubernetes scheduless pods across the nodes correctly
Deploy an Nginzx pod with multiple replicas
kubectl create deployment nginx-test --image=nginx
kubectl scale deployment nginx-test --replicas=3
check pod placement across the nodes
kubectl get pods -o wide
expected output an example
NAME                          READY   STATUS    RESTARTS   AGE   IP            NODE           NOMINATED NODE
nginx-test-6f4c9b8f95-abcde   1/1     Running   0          2m    10.42.1.5     k3s-worker01   <none>
nginx-test-6f4c9b8f95-fghij   1/1     Running   0          2m    10.42.2.10    k3s-worker02   <none>
nginx-test-6f4c9b8f95-klmno   1/1     Running   0          2m    10.42.0.8     k3s-master01   <none>
Health check
Make sure that the pods are in Running status and evenly distributed among nodes
Quick reference commands
retrieve the token from master node
sudo cat /var/lib/rancher/k3s/server/node-token
to install agent on worker node
curl -sfL https://get.k3s.io | K3S_URL=https://<MASTER_NODE_IP>:6443 K3S_TOKEN=<TOKEN> sh -
to verify nodes run the following command on the master node
kubectl get nodes
kubectl get pods -o wide
Advanced Configuration and Best Practices
After successfully installing K3s with Calico, apply these advanced configurations and best practices for security, troubleshooting and performance tuning
A. Security Considerations
Securing our K3S cluster and Calico deployment ensures that we have a reliable ad protected cluster
- Securing K3s and Calico
Regularly update the K3s and Calico to make sure that security patches and updates are applied
# K3s update example (do this on master and worker nodes)
curl -sfL https://get.k3s.io | sh -
- Limit the Kubernetes API access by IP using the firewall tules or Configure a load balancer with only allowed IP addresses
- Secure Calico Components
- Enable mutual TLS between Calico components if applicable
- Regularly update Calico manifests and pods
- Kuberenetes RBAC
Kubernetes RBAC manages permissions in your cluster
- Create roles and role bindings
- Example: Allow read only access to pods in a namespace
# pod-reader-role.yaml
kind: Role
apiVersion: rbac.authorization.k8s.io/v1
metadata:
  namespace: default
  name: pod-reader
rules:
- apiGroups: [""]
  resources: ["pods"]
  verbs: ["get", "watch", "list"]
- Assign a rile to a user
# pod-reader-binding.yaml
kind: RoleBinding
apiVersion: rbac.authorization.k8s.io/v1
metadata:
  name: read-pods
  namespace: default
subjects:
- kind: User
  name: jane  # replace with your username
  apiGroup: rbac.authorization.k8s.io
roleRef:
  kind: Role
  name: pod-reader
  apiGroup: rbac.authorization.k8s.io
